How to Fix Five Common RV Problems
5 Common RV Problems and How to Fix Them!
[WPXperVideo id=16 ] We’re gonna be talking about five things that kind of plague our RVs or something that comes up that could be a problem. Once you know how to handle it it’s not really that big of a problem. I had an email about somebody that was kind of turned off from RVing because it seems like it’s just plagued with tons of problems and something to fix all the time and if you know how to handle these things they’re really not that big of a deal. It’s no more than say living in a house or maintaining a car or something like that, so let’s dive right into it so one of the big problems no I say big problems.
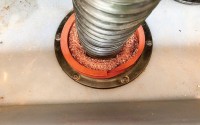
One of the problems you can have in your RV is maybe a busted water line and maybe it might be intimidating. You look under there and you see the the PEX plastic piping and what do you do with that. So I just keep a couple of small things on the rig. They don’t weigh too much and they don’t really take up that much space but I use some of these. This one’s actually like a shut off. This one’s kind of handy because you can almost use it as like a cap or something but with the PEX piping that they’re putting in these rigs you can use something extremely simple like this if you have a problem. Say you had a pipe freeze or maybe the pressure was too high before you put on the pressure regulator and something popped. So you’re able to cut out that bad section of pipe but you can take this guy and you can just push it right onto the pecs. I mean it’s literally that easy and you can take these off by pulling that in and pulling this right off but the cool thing about this is if you cut out that bad piece of pipe push this PEX piece on there and now you have a shutoff and a turn back on. So if you needed to do something like that where you needed to continue working on it but you wanted to get water to the rest of the rig this little guy comes in awful handy in a pinch. So I also keep a few other of these pieces. This is just like a compression fitting you’re just going to basically jam this into the pipe. After you put this on there this little nut goes on there and you’re gonna jam that into the pipe and work it in there real good. Then you’re gonna tighten that down and it’s gonna be a compression fitting for on this PEX piping and if you didn’t want to buy this fitting, if you wanted to just pick up something from Home Depot they have those sharkbite push-on fittings. They actually work really well and I’ve seen them in in years of service in different homes. So handy little thing. Get some kind of coupler cap connector that might be easy to have on hand. They’re just real easy to find.
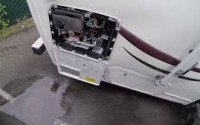
But while we’re talking about leaks why don’t we talk about the other areas in your RV that could have potential for leaks. So the roof. Any of those seals that need to be addressed. Anything around the windows. We had a window on our door the other day that was leaking when the rain was driving. That way the seal was just it was just gone around the glass. It’s just after years of use the the seal just wasn’t functioning properly anymore. So there’s a couple of ways that you can tackle a project like this and it’s better to tackle it when you’re at home or in a place where you can work on it easily, rather than being out camping or RVing. Then you realize that you have a leak so doing some inspection and checking these seals out before you get out on the road is always a great idea. Sticking towels on the roof when you’re out RVing, trying to stop that leak, isn’t always the best of nights when that happens. But a couple of options that you have; you can cut away the area. Like if you see an area of caulking or that seal that’s cracked. I recommend cutting it out trying to get back to kind of the frame of the window or the frame of whatever’s put into your roof or your wall and cut out the bad seal. If you’re doing it on the roof don’t cut through your EPDM roofing but if it’s on the wall fiberglass cut it out and be able to get a good seal. Just don’t cover up the bad caulking or bad seal. Try and cut out as much of it as you can to replace that. Now if you want to take it a step further like I did on this window, I pulled the whole window out and I scraped any of that inside sealant and just removed it, cleaned it up, got it all the way down to the base materials and then I put a new bead in there put it back together. This thing should be great for a long time. I shouldn’t have to think about this window again. Now the sealants that I recommend for sealing up something like this on an RV is almost always the Dicor product. They have two different kinds. One is used on the vertical surfaces, so around the doors and the windows and then they have another one that’s a self-leveling lap sealant that is great on the EPDM roofs. Up on the roof you can use a self level obviously and they work fantastic. Now I know some people love to keep that tape on hand and it’s not a bad idea to keep that on hand if you had maybe something scratch your roof or you hit it against a branch and you have a little a little puncture in it. You can use that tape. It’d be fantastic for something like that. Now on this project I used this stuff. It’s a Quad by OSI and it worked well for this application but almost all the time I recommend the Dicor product. It really is a good deal. <a target=”_blank” href=”https://www.amazon.com/s/ref=nb_sb_ss_i_3_5?url=search-alias%3Daps&field-keywords=dicor+rubber+roof+products&sprefix=DICOR%2Caps%2C357&crid=2PHQ3HD3G6B92&_encoding=UTF8&tag=wwwfishfriend_th3-20&linkCode=ur2&linkId=ba1cb3819ea102d3b900daef39361255&camp=1789&creative=9325″>Click here for Dicor range of products</a><img src=”//ir-na.amazon-adsystem.com/e/ir?t=wwwfishfriend_th3-20&l=ur2&o=1″ width=”1″ height=”1″ border=”0″ alt=”” style=”border:none !important; margin:0px !important;” />
Now let’s talk about propane because propane is one of those things that I’ve seen a very typical common denominator. When trying to diagnose propane problems and oftentimes people think that they have an issue with their device like their their stove or their water heater or something else and oftentimes you you can have problems with those you can have an issue with your duel energy refrigerator where maybe that that propane is not igniting properly. You could have an issue there but I think it’s always really good first to look at the propane source. So obviously do you have propane in the propane tank but that pressure regulator at the propane tanks I have seen fail more times than not when somebody’s trying to deal with their propane. So sometimes though the leak spewing propane out which is obviously a massive problem you want to swap that thing out as quick as you can. I’ve also seen where they don’t supply as much propane as they should be or as they once did and you’d think that you have like clogged or faces on your your range or your your oven or something like that and really it’s just that pressure regulator not allowing the the proper amount of propane to be delivered to the appliances. So if you’re trying to troubleshoot the propane start first with your pressure regulator and then move on down to your appliances and see if there’s an issue there but that propane regulator pressure regulator often goes out and is easily replaced. When you replace it make sure you get the the proper type of compound or propane tape for some of those seals when you’re putting that propane regulator back together there. They go together pretty easily and there’s not much to them, just a couple of pipe fittings and you’re good to go.
Now if we’re talking about a list of problems you can have with RVs you have to talk about being able to continue to roll down the road and the tire is right in the center of that subject. So we’ve done a whole video on tires with date codes and inflation and and all those things so check that out. If you haven’t seen that video we’re getting ready to upgrade our tires or swap out our tires here. We just ordered these. They are Sailun. They are Class G so they’re a step up from what we have. They’re kind of overkill potentially for the trailer but I think that’s good. They’re gonna be a really strong tire. I’ll let you know more about it as we use them and and what we think of them as we roll down the road but make sure that you have a spare. Have a good spare that you know how to take it down, you have all the tools to be able to change it out, jack and all that so if you do have a blowout or an issue, a flat tire or whatever you’re able to get that swapped out and get you rolling back down the road. But in the middle of this we also have bearings that we need to keep up on the maintenance. So when we swap out our tires we’re going to repack our bearings. I’ve pulled them off and I’ve repacked them before and it’s not really that difficult if you wanted to repack your own bearings. But when we’re having the tires swapped out I’m just gonna have the place that’s doing the tires repack our bearings because you want that lubricant in there so that you’re not building up any heat. You don’t want that bearing to break down because if that happens you’re not gonna be going anywhere with a busted bearing in there or burnt out bearing so keep maintenance on your bearings. And then also down here we have suspension parts that can potentially wear out. We had some wear out and I didn’t keep it close enough eye on it and these brackets that hold the tandem axles together for the suspension ended up just blowing out the the one end and those parts under there with your suspension, it’s a good idea to keep a good visual inspection on them to make sure nothing’s looking like it’s wearing out or getting ready to fall apart. They’re not real difficult to swap out but there’s options out there if you wanted to upgrade that system too. There’s a couple that I’d love to check out. There’s the the mo ride system there’s the I think the equi flex or something like that, Some great systems with wet bolts of so that some of those things don’t wear out as easily like what we have on here. Now instead of having a wet bolt that you can grease and grease would fill in where this is having to rub metal the metal we have these these little guys that they’re just like a little bushing to kind of keep that wear on metal to metal down. but you want to keep an eye on these suspension components so that something doesn’t wear out while you’re going down the road. One more thing that we did down here is we took Mark and Trish’s recommendation. We welded some metal on the ends of our leaf spring hangers because it adds so much strength to where your axles are that I mean that’s what’s suspending your trailer up and that adds so much strength to those. It’s kind of like if you can why not do it. It’s just going to be a safe way so let’s move on to electrical.
The RV electrical system. It’s hard to say this is where the problem always is or this is always where you need to look. It is a complex system and that’s why I plan to do more videos about RV electrical so that you can understand it and understanding it will help you diagnose and solve any problems that come up that much quicker. I like to approach it almost like a game of guess who so I can eliminate a lot of things and narrow it in on where I’m actually having the problem. So first question I usually ask is that on the 120 volt side or is it the 12-volt side. Now the 120 volt side you’re gonna have things like your your microwave, your outlets, your TV. Those are the typical things you’re gonna find on the 120 volt side. Now on the 12-volt side you’re gonna have things like your your lights, your vent fans, your slides, your jacks. Those are gonna be the things on the 12-volt side. So let’s say we’re looking at the 120 volt side system. In the first place I usually look if I have a lot of things out. I’m gonna look at that pedestal to see if that pedestal that I plugged into, is that breaker tripped, is there an issue with that breaker. Find out if your rv’s actually receiving power and then if that’s good I go to the the circuit panel down below where the breakers are going to be and I’m gonna look at the main coming in. I’m gonna look at all the different circuits and see if I have something tripped. Most the time you’re able to trip a breaker off, trip it back on and you’re back up and running. I mean it’s just like a home, there’s not much to it. Now you might have an issue further down the line with a device but then once you’re eliminating some of those things you can narrow it down and figure out which device you need to fix or replace. Now on the 12-volt side is a little bit different than a home because we’re gonna have fuses and circuit breakers and different things like that along the way. So if I’m looking on the 12-volt side first place I’m gonna look if I have a lot of things not working. Is my disconnect for my battery open or something like that, so you can look there. If you do have things running but it’s only maybe a certain circuit you can go and check out your fuses. These are easy to check. You can either put a multimeter and check each side of the fuse or the easiest way to do it is to just grab some needlenose pliers pull the fuse out look at it and see if that connecting circuit in between those two terminals is good or bad. If it’s bad you’re able to replace it. Maybe that circuit just got overloaded for some reason. maybe you did something to overload it. You’re able to swap this and get it back up and going. Now it’s important to remember when you’re pulling out a fuse and you’re replacing it is to look at the number that’s on the fuse and replace it with the same type of fuse. So if you’re pulling out a 30 amp fuse don’t put in a 20 or a 40. You’re gonna want to put in a 30 amp fuse. If you go lower than that that fuse is gonna pop extremely easy and it’s gonna be annoying. You’re gonna be in the same spot again and if you go above it then it’s not protecting the wires and the devices that that fuse is supposed to be protecting. Now another thing we see in these RVs is we’ll see these type of circuit breakers on the 12-volt side and they’re usually automatic so you’ll have power coming in and power going out and if there is an issue where these trip these typically are automatic so that you don’t have to go and press a button or anything like that. These guys are great for that but one of the things we do have to look out for is sometimes they’ll hide these fuses, I don’t know why they do that ,they kind of hide these fuses around like on trailers. They’ll put these ON the tongue to protect the jack, the electric jack for putting it up and down and so you might have a hard time finding one like this. So if your jack’s not working you might look on the tongue to see if you have a blown fuse and a little in-line setup like this. so these are thing things to look out for, They can be hard to find sometimes.
Well that’s gonna wrap up our five things and most of these are just taken care of with just good maintenance with your RV .