How to install a Fan-Tastic Vent
Fan-Tastic Vent Installation. Hi guys! So are in the process of getting ready to go vacation. We’ve been doing a few upgrades and things here and there. One of the things we’ve really been wanting to do is upgrade our vent that’s in the kitchen. We’re gonna upgrade it to a Fan-Tastic Vent and we have one right now in our bedroom which is awesome. So we’ve been talking about changing that to kind of help with airflow and help vent out the kitchen when it gets hot and steamy and all that kind of stuff.
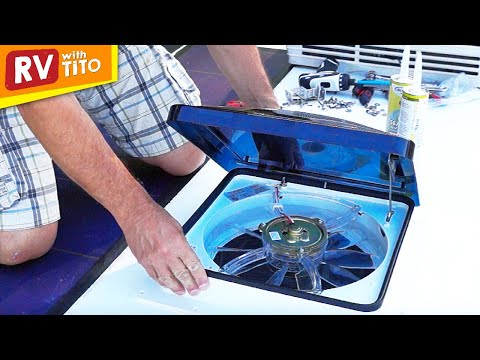
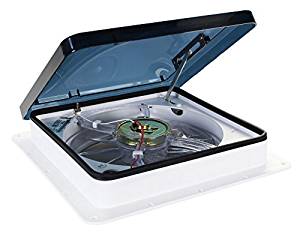
Because this little vent above the stove just doesn’t do anything. It actually takes up too much space and, anyways, that’s a whole other upgrade. When we’re cooking the smoke alarm goes off. Everybody in the campground knows we are cooking something. Beep Beep Beep! So anyways, today we’re upgrading. I’m excited. Yeah so, I picked this up from Camping World. They had the best deal at the time. They had a sale. I always try to look for the best deal. And um, it’s pretty cool. You guys kind of know what the Fan-tastic vents do. There is a quiet fan with variable speed. This one has a thermostat to shutdown and startup, a three speed fan, and it’s reversible. This is what I really liked about this is that it’s reversible. When we are cooking we can put it on vent mode with will suck. And when we want some more breeze in here we can reverse it and it will actually suck in air from the outside and blow around in here. And that will be nice because this area tends to get hot. So it will be nice to cool it down.
So these two wires can be wired into this light. I’ll just have to tear out some stuff on the top and it should go pretty smoothly. I hope so. Alright. Remove the old vent. Carefully scrape away sealant to expose screws. Then remove screws. Carefully pry the vent away from the roof. There will be putty holding it down so take your time. Preparing the roof for the new vent. Alright. So removing all of this DICOR is a bit of a chore so take your time and be careful not to damage your roof in the process. So what I’m going to do now is carefully remove a lot of this sealant from the top of this. You can see here’s the membrane for the roof. So I’m going to be careful not to damage that. The vent will site right in here. I’m just going to scrape this away gently all the way around, removing as much as I can. It’s gooey. It is gooey. Hello! Ha ha ha. Yeah you gotta fix that. Make sure it’s closed by tonight! Ok so I’m almost done removing the old vent and all this old DICOR and sealant. To finish it up, I’m going to use some mineral spirits and a rag. I’ll gradually work it in and get the rest of it up. I’ll get it all nice and clean and ready for the new vent. So I’m gonna keep working on this. This just kind of softens it up. Just give it time for it to do its thing. Gradually you get it up. So far the hardest part of this job is the removal of the vent and all of this sealant and DICOR off of the roof. Once I start installing the vent it won’t be that difficult. But I’ve been working on this part for about an hour and I’m just taking my time to make sure that I don’t get over anxious and damage my roof in the process.
Ok it’s all cleaned up and I’m ready to install the new vent. But I’m not gonna lie, it took a little elbow grease to get it all wiped up and cleaned up. Check out this box of DICOR chunks. Eeew! Ok. I’m about ready to put this vent on, but there are a couple things I had to pick up from my RV store. The first thing is this butyl tape. It’s kind of a putty sealant with sticky sides. I’m gonna use it to create a water tight barrier between the vent and the roof. Finally once I get all the screws and everything in, I’m going to seal it all up with this self leveling DICOR sealant. That white stuff you see sealing up things on your roof. I got a couple of these and that should do the trick. And this should be plenty and should give me extra for another project. So, first things first. I’m gonna get some soapy water and clean this up real good and I’ll be ready to put on the vent. Yup. I used screws from the old vent. The new holes may not line up, so pre-drilling new holes may be necessary. Ok. The last thing to do up here on the roof is to put a nice coat of DICOR on this, seal it up and let it do its self-leveling thing. So I’m going to go ahead and do that,. , starting with the screws.
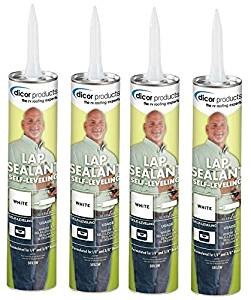

The important thing about DICOR is to apply it when it’s warm. It doesn’t really work well if it’s cooler out because the DICOR has to be at room temperature in order to do its self-leveling thing. I’ve actually had to take a blow dryer to the DICOR before applying when it’s been cooler outside. Or let it sit at room temperature for a while before applying it. Connect the fan to 12 volt power. The final step of this project is to basically wire up the fan. There are two wires coming out and a little groove here that they will set in. I’m gonna maneuver it around and fish it into this hole that goes to this light and wire it to this light. I’ve tested this out earlier to make sure fan works. I’ve just finished twisting it on to these light wires. I’m double checking to make sure everything works. Yeah. It looks like I have power to the fan. Everything is good to go.
Alright. So we’ve had this vent installed for a few days now and what do you think? I like it. We’re actually on a trip right now and we have gone into some hot weather. Um. It’s gotten pretty hot and we’ve done some cooking. We turn that on along with our A/C to cool the rig down a lot faster. To create some good airflow. We have another one in the back too. So with both of them running it’s “Fantastic”. I wonder how they came up with that name. I wonder. He he he. Yeah I like it too and it looks much better than the vent that was there before. We’ve had our rig, what, seven years now. And things start to discolor a little from the sun. The one we had before was yellowing a little bit. This has a white base to it. Just looks new, fresh. Yeah, I like it. Yes. Pretty easy to use. Sucks real good. That was the point. Ok. I like it. I think we’re gonna keep it. I think so. It’s stuck to the roof. I hope this is helpful. Here is a link for you to the latest prices of Fan-tastic fans on Amazon

See you guys next time. Bye. Thanks for watching and let us know what you think in the comments below. Also subscribe if you haven’t done so. See you next time.