How To Winterize Your Camper
How To Winterize Your Camper
As you’ve probably noticed, the kids are back in school and the leaves are starting to change color, so it’s time for us to start thinking about winterizing our campers. So in today’s segment, I’m going to take you through this brand new Bullet Premier and I’m going to teach you how to do a basic winterization. I’ll go through the tools necessary and all the steps to show you guys how to winterize your RV. All right. So, back in my days in the service department, these are the things that I would kind of take with me to go an do an RV winterization, so I was prepared to do any camper that was out there. So, as you can see, I’ve got my screw gun with a #2 screw tip in it to access the back of the hot water heater once we get to that stage. I’ve got a couple pair of channel locks here. And the out hood of the hot water heater has got a plastic plug. That’s how I would pull those out. Suburban hot water heaters have an anode rod in it, 1-1/6″ socket.
Depending on which water pump we had, either a jet pump or a sure flow pump. Sure flow pump’s going to be a 1/2\” male pipe thread fitting. Jet pump’s going to be a quick connect fitting. So you’re going to want to check out what kind of pp and what kind of water heater you got to provide yourself with the proper tools, before you go ahead and winterize. I’ve also got a roll of paper towels here to clean up my mess when I’m done. Couple gallons of antifreeze, and I’ve done thousands of these, so I can usually get by with two gallons. You may want to get yourself three or four if it’s your first time out there. Just make sure you’ve got enough. It’s not fun to run out in the middle of the job when you’re not quite done, so just make sure you’ve got enough product to do the job. Okay. So here we are, at our hot water heater. And the first thing you want to do when you winterize your camper after you know you’ve got all the proper tools is, we want to empty all the tanks. So we want to empty the fresh water tank, the black water tank, the galley and the gray tanks, and most importantly, our hot water heater tank.
So, this guy here happens to be the Atwood with the plastic plugs, so we’re going to use our channel locks on this one. One very important thing before you empty your hot water tank is,if you’ve got an electric hot water heater element, we want to make sure that that device is shut off. Once we drain the water out of this tank, if this camper gets plugged in,that element will come on, and with no water in that tank, it will burn out the element,and it will need to be replaced. So before emptying this tank make sure, the electric elements are off, from the switch inside to the service switch on the water heater, or even the breaker inside your RV. That way we won’t run into troubles down the road. So anyway, back to our water heater. I’m going to drain this guy off right now. So we’ve got the plastic plug down here below, as I mentioned. So I’m just going to loosen this guy up. Now to relieve the pressure on the hot water heater so we don\’t get a blast of water coming out here, I’m just going to crack this relief valve, which will also help it drain out a little better. It’ll let some air go into the top of the tank as we’re emptying the tank out. There’s the plug. There’s our water coming out. Relief valve is open, so a good flow of water.
When you put this back in, you’re going to want to put some Teflon tape on, or some Rectorseal to seal that up, so you won’t have any leaks in the spring. So after we’ve dumped out, hot water heater from the outside of the unit, what we want to do is use that approximate location to find the back of the hot water heater inside the unit. This particular one here is located in this cabinet for us. So what, what the water heater bypasses and what you’re going to see on the back of the hot water heater when you access it is a series of valves or maybe one valve. What we, we don’t want to put six gallons of antifreeze in that hot water heater tank. So what we want to do is connect the hot and cold plumbing lines together so we can go ahead and winterization the hot and cold side of our camper without filling up that tank. So this guy here is the three valve system, which we’re going to see in older campers that are out there.
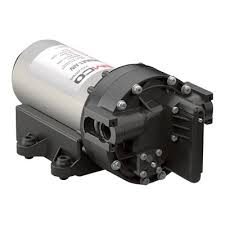
What I’m going to do is just turn these valves in the opposite position as they are right now. Right now they’re in the use position, so we want to turn them into the winterization mode. So cold line off. Outgoing hot off. And our connector pipe between the two, we went to put that on so the antifreeze can travel into the hot side of our plumbing system. So what we’ve got here in this particular unit is, the single valve system, which we’re going to see in some of the newer product out there. And, they’re using, a check valve in the top of the tank, rather than the three valve system. So all we need to do, right now that valve’s horizontal, that’s the use position. But we need to go flip it to vertical. That way we’re allowing the antifreeze to flow up, the connecting pipe and into our hot water plumbing system. All right. So, I know where the particular water pump is in this unit. If you’re not sure where your water pump is in your unit, you can g o ahead and, turn the water pump on and listen for it audibly. You will hear the pump run. It’s not going to hurt to run that pump dry for, a few minutes while you locate the pump. Once you’ve located the pump, then we need to go ahead and access it. I’ll just finish removing my screws here. And down below here I’ve got my, water pump. In this particular coach we’ve got the jet pump, so I’m going to be using, this fitting here that works in conjunction with the jet pump.
Now to to figure out which side is the incoming end of the water pump where we want to hook our hose to to draw the antifreeze from, how I typically do it is, there’s going to be a flex line coming off that pump, going usually to the underbelly or to our water tank where our fresh water is held. On the other side of the pump you may see a T or some hard plumbing to it. So usually that single flex line is going to be your incoming side of the pump. So what I’m going to do right now is undo that. You might get a little water run out there from the head of the pump. That’s what the paper towels are going to be for, to cleanup a little bit. Now I’m going to install my winterization hose, which I’ve done here. And again, if you’ve got a Sure flow pump, which is going to be a, a metal case with a black head on it, we would use a 1/2″ male pipe thread, where the jet pump is a quick connect fitting.
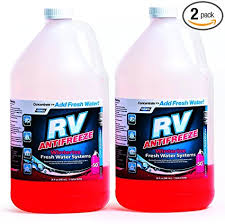 CHere we are with our antifreeze. I’ve got my hose hooked up. This particular one, I think is going to work best for me to set this down here to draw from. I’m going to go ahead and insert my hose into the antifreeze jug. Then we\’re going to go, turn the water pump on and start running our faucets. Now, before we turn the water pump on, we want to make sure all the faucets are closed. We’ve already also done our hot water heater bypass, so with all the faucets closed, we’ll turn the pump on and start winterizing. Here I am at the kitchen sink. I’ve turned my water pump on. We’re starting to draw out of that, antifreeze jug that we just hooked up. So what I’m going to do now is turn the cold water on, and I’m going to run it till I see pink. It’s pushing some air out of the system. And there’s a good pink flow. I’m going to do the same on the hot water side. Now sometimes, I’ve heard before that it’s best to run, you know, the farthest sink away first, and then work yourself towards the pump. I’ve done thousands of these, and I’ve never had an issue, and I don’t, there’s no real rhyme or reason. I just make sure that I get a good pink flow, on every faucet before I put it away. The pex plumbing will take freezing, even if there is a little water in it. It’s our fixtures and our, our connections, the plastic fittings, that do not take the freezing. They will crack. So, I usually just start with the closest faucet to me and run both until I see pink. Same with the bathroom sink. Nice pink flow there. And again on the hot water side, and we’ve got good pink there. So next I’m going to do the toilet, and this guy here is a foot flush. So I\’m just going to, flush the foot flush till I see a good flow of pink to get it up in that valve there.
Here we are in our shower, and I’ve, removed the shower head and brought it down here so I can kind of control the flow. Again, cold, hot. Now I’m going to run it up through the shower head. And I’ve got good pink everywhere there. So we’re good to go. Some people will actually undo the shower head, from the faucet to alleviate any water or antifreeze that may sit in there through the winter months. So a lot of coaches are coming equipped nowadays with some sort of outside shower or hot and cold running water outside, so we want to make sure that we get that. I can honestly say that I’ve forgotten it in the past. So,just make sure you put this on your list of things to do. So, again, turn the water on till you see pink. A good way to see it out here is run it against the body of a white coach, make sure that you’ve got the water out. And we’ve got good pink there.
Before I came outside, I switched over my antifreeze jug, because I noticed it, I was running a little bit low. And you’ll have to do that throughout the process, depending on, how much you use, obviously. So the system is winterized with the water pump. We’ve got one more step and we’ll be done. To complete our last step, and this is a very important thing to do, after we’ve done all the water receptacles, i.e. the sinks, the toilets, the outside showers, everything like that, really important, we need to come back in the coach and turn off our water pump. The water pump pressurizes the system at about 40 PSI. So we want to turn that pump off so we no longer need to pump antifreeze through the system. And the next thing I’m going to do is I’m going to come in and I’m going to open the cold water faucet. So I’m relieving any pressure on the system whatsoever, and we need to do this to winterize the city water fill. So, now you can see this has stopped running. I’ve alleviated all the pressure on the water system.
Now we can go outside and do the city water fill, and we’re going to be done. So after we’ve turned off the water pump inside, and, we’ve relieved the pressure on the system,we want to come outside to our city water fill. And this is where we’d hook our garden hose if we were at the campground. And this often gets overlooked, and I’ve seen a lot of them change because of it. So first thing we want to do is pop this screen out here. And there’s a check valve in here, so when we’re using our water pump, water doesn’t spray out the city water fill. Now, if I were to press this in while it was still under pressure, it would allow me to press it in, but it ruins an O ring in there. So that’s why it’s really important to alleviate that pressure on the system that the water pump has provided for us before we push this check valve in.
 So now with the water off, pump off, system we left the pressure, I can go ahead and pump this in and you’ll see water run out. I’m just going to hold that in there, and now I’ve got antifreeze. Our system has been winterized. All right. So after we are done with our city water fill, what I like do is I take the paper towels that I mentioned earlier in the video. I like to tear off a couple of them and kind of leave some in the base of my sinks and my shower. That cleans up the little bit of antifreeze that, may have been left in the sink or the shower. Also it’ll catch any residuals that will come out of here. If you have any antifreeze left in the jug, from your winterization process, you can go ahead and pour the extra down the trap. It’s a little bit extra line of defense there. Again, all these things can be purchased, at our Pete’s RV online store. That can be, accessed from PetesRV. com. There’s pump converters and things out there that might make your winterization process easier. The other thing with this video that we’ve just made is, I kept it very simple, down to basics on this. There are some devices out there that do need attention that I did not mention in this video, sewer flushes, washer and dryers, ice makers, things like that. That’s stuff you really want to bring to your local dealer and have done. That way you won’t have issue with it in the spring. But this should get you going on where you need to be, and maybe give you little pointers, and I hoped you learned something about RV servicing.