Preparing and Storing Your Caravan for Winter
Preparing Your Caravan for Winter Storage
Today’s subject is winterizing the caravan. For many it’s a time of year that they put the caravan away until the spring of next year and there’s a number of steps that you need to do to make sure that the caravan is put to bed properly and so in today’s article we’ll be going through some of those steps.
So going through the caravan there’s a number of things we need to do and we’re going to start off with cleaning the caravan. So step one cleaning the caravan. It’s very simple we need to clean everything outside and inside so what we do is start on the outside and we’re going to start by cleaning the roof. Cleaning the roof brings out all of the dirt and the grime off the roof and down to the sides so again we need to clean the sides and make sure the whole caravan is spotlessly clean. Now a top tip. Buy yourself a pack of paint brushes from the DIY store get yourself a two-inch brush out of that pack and use that to really get into all the nooks and crannies in between the joints of your panels and around the awning rails and indeed the gutters as well, make sure you pull off as much green as much mold, as much black as you possibly can make sure the caravan is spotless. Then once it’s spotless what we can do is use some products that are designed for winterizing the caravan. Fenwick’s produce a winterization solution which you just use in your wash and you spray over the caravan. It produces a barrier that hides and dispels moisture from the surface of your caravan then in the spring we need to do is just wash it off. Now what we do is we use a good car wax. We go over the entire caravan and we wax the entire surface that very small barrier is enough to dispel any moisture and helps the water runoff from the caravan.
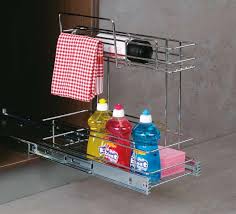
So once we’ve cleaned the outside we need to nip inside and clean all the cupboards so what we’re going to do is we’re going to wipe down the cupboard doors, wipe down the covered interiors and vacuum out any crumbs or any muck which may be inside. Remember to take out any food items as well, so half-eaten packets of cornflakes for instance, remove those. We generally leave tinned items in the caravan because well they’re they’re never going to release any odors or go off so we’ve got an emergency tin of baked beans, an emergency can of soup etc. We leave those in the caravan, but everything else make sure you remove it and if you’ve got salt and pepper make sure you take those out as well. The salt will attract moisture and they’ll become useless when you come to reuse the caravan. Finally once we’ve done that we need to move onto vacuuming and we start again from about waist height and we vacuum everything going down so the sides around the front of the caravan, behind the sofas, under the sofas, in the cupboards, in the lockers. Places you may not usually be vacuuming. You want to get into the corners and pull everything out to try and get in and remove as much dust, as much hair as much whatever gets dragged into the caravan, as much of that as you possibly can.
OK step two; the water system. Probably the biggest thing that people get worried about when winterizing their caravan is the fear of frost damage and the fear of anything to do with the water going off and you know what is a real problem because if you leave any water in your pipes or your tanks there is a very real danger of frost damaging the pipes in your joints. When we say frost damage what actually happens is the water inside your pipes expands. It weakens the joints and in some cases can split the pipes. So what can we do to resolve this. Well there’s a couple of things that we can do to reduce the risk of frost damage. There are pieces of kit available on the market which you can plug into the side of the caravan and allows you to blow air through the pipes forcing out any last residuals of moisture from inside the pipes. It’s surprising how much water still can be retained inside your pipework. The second thing we can do is open up all the taps, open up all the drain down flaps etc. Make sure all of those are wide open. That allows the any residual liquid inside the pipes to expand freely and not pressurize the system. What we do is we ensure that whenever we leave site all our taps are left open anyway and our drain down flaps are left open so that all our hot water and all cold water toilet tanks etc everything is drained down before we leave site then the simple act of us traveling home and that rocking motion does to spill quite a bit of liquid but it won’t remove everything so it is a good idea to buy those pieces of equipment which plugin and allows you to remove even more out of the system.
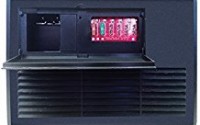
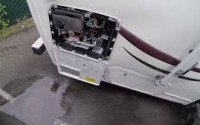
Step 3 is gas. Well that’s really straightforward all we need to do is just disconnect and make sure everything is switched off and isolated. If your regulator is attached to the caravan you’ll usually find an isolation switch right beneath it. If not they’ll be isolation switches inside the caravan. You shouldn’t be fiddling around with the electrics as these are usually self maintained and you don’t need to worry about it too much, but there is one important element inside the caravan which does need some special consideration and that is the leisure battery. You can’t just put a leisure battery into a caravan and forget about it. It does need some care and attention to ensure that it’s going to work first time when we go out in the spring so we’ve got a number of options. What we can do with the battery, we can either remove the battery completely from the caravan, we can connect a trickle charger to it somehow, we can connect the electric hookup to the caravan and use the inbuilt charger or we can use something like a 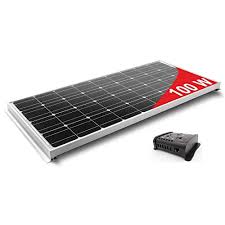 solar panel to supply a constant charge to the battery. Now we are situated on a storage site and the terms and conditions of our caravan insurance state that we need to have the alarm and the tracker permanently enabled so what that really means for us as we can’t remove the battery. We cannot connect it to electric hookup because when on the storage site we don’t have access to a inbuilt battery charger so instead what we use is our solar panel. What that does is supplies a constant charge whenever there’s daylight to the battery and make sure that the battery is fully topped up.You can check here the latest prices for solar panels on Amazon
Now when I go and visit the caravan I always make sure that the electrics are ok and I do check to make sure that the battery is up to charge. Failure to do that, if you just leave it in there the battery will discharge and by the new year it will be completely useless. So make sure you maintain some charge in it. If you are able to remove the battery take it home keep it warm and occasionally attach a charger to it as well and that will keep it in really good condition.
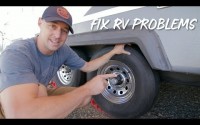
Okay so step 5. We need to look at the brakes and the tires. Now to make sure that the brakes don’t stick on what we can do is we can chock the tires and release the handbrake and the other thing is if the caravan is going to be left idle for some time it’s worthwhile every few weeks to move the caravan backwards and forwards try and get the tires to land in a different position. It could be that what we need to do is jack the caravan up and physically remove the tire around or if you have got enough space we can move the caravan forward. If we were to leave it stood for any period of time I would jack my caravan up and physically move the tire around because we just can’t move it back and forth on the storage site.
Step 6 We need to go back inside the caravan and make a mess. So open up all the cupboards, open up all the drawers, make sure the cookers open, the grills opened, the space beneath the cooker, every single thing needs to be opened and all the cushions and all the paddings and every piece of furniture is pulled in from the outside of the caravan. If you can, take everything out from the caravan and take it home. If like us you cannot because you just don’t have the space the best thing you can do is put everything into the center of the van.
Now finally there is an argument pro and con for these things and that’s dehumidifiers some people say not to bother, not to worry about them because the caravan is designed to have moisture naturally aerated around the thing and that’s true it is. There are gas escape holes in the floor of every caravan so be mindful of that we don’t put any dehumidifiers right next to those things because it’s just completely pointless. It is just dragging moisture through the outside. Instead put them around areas which usually would attract moisture. So we have them in the bathroom. For instance we have them in the covers of the tops, we have got them around the caravan just to remove any last bit of moisture from the the van itself. We also just put in a couple of air fresheners as well, nothing overly smelly. I think we use Neutrogena ones just to remove any odors from the caravan and we use one at the front and one at the back just to keep the air smelling fragrant.
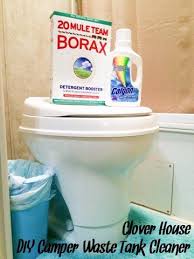
Finally, finally the last step is the toilet and it’s very simple what we need to do here. We need to make sure that the flush is completely drained. If you’re using pink solution flush there’s good reasons for that. We also need to remove the tank as well and clean inside the cavity around where the cassette would go and also clean inside the cassette thoroughly as well. Again there’s chemicals available on the market which remove that calcium buildup that you can sometimes get and also allows you to refresh in the tank as well. The other thing we need to do is just rub some lubricant around the seal on the toilet so either by the proper seal lubricants that you can get or just use some olive oil on the rubber ring as well but just make sure that the slider closes and opens perfectly every time. Once its back inside the caravan we need to make sure the cassette is left open again, we’re not trapping any moisture and we’re not going to trap any bad odors inside the cassette. Then just rub down the toilet with a good cleaner as per usual. Again if you need to you can use a brush just to clean around the back of the toilet as it’s a little bit dusty and again vacuum out as per normal. Once that’s done it’s good to go.
Well guys that’s it from the winterization article. We’ve covered pretty much all the steps that you need to go through with most recreational vehicles. I check when I pop up to the caravan and I make sure that everything is in order. Now you may have noticed I haven’t discussed covering your caravan for the winter and there are pros and cons to cover your caravan. For us it would stop us using the caravan. we tend to go away with it at least once a month and the other thing is if asked to cover the caravan it would block the solar panel which basically means we wouldn’t be getting any charge into the battery. So for us for those reasons we don’t bother covering the caravan.
How to Replace an RV Power Converter
How To Winterize Your Camper