
RV Trip Wizard Review
RV Trip Wizard Review
I want to take just a couple of minutes to do an RV Trip Wizard review and show you some of the things I like best about RV Trip Wizard as well as some of the things I like least about RV Trip Wizard.

In one case, one feature actually comprises both one of the things I like best and least and I’ll show you exactly why. One of the things I do like best about RV Trip Wizard is its ability to calculate a reasonably accurate cost of our journey. This is much more accurate than the calculations provided by, for example, the Good Sam Trip Planner as Good Sam only takes into account the cost of fuel, whereas RV Trip Wizard allows us to calculate not only the cost of fuel and specify what we consider to be average cost-per-gallon but it also takes into account other costs like the average cost of a campground for the evening, the average cost of meals for a travel day, and we can even add in a buffer for additional miscellaneous expenses that we might not expect to incur like having to replace a fuse or pay $0.50 for air for the tires.
So I’ll show you where to change that in just a moment but you can see that date reflected here in the cost column in my existing trip plan. In this particular case, I have only planned out 4 nights so far on this particular journey. You can already see I’m looking at a total estimated cost of approximately $378. Now that includes my fuel costs, that includes 4 nights in campgrounds, and again 4 nights of potentially eating out while we’re traveling. We likely won’t incur all of those expenses and I know that for at least two of those nights we’;ll be boondocking at a national forest or BLM land. So I can reduce those expenses from the total cost but nonetheless I’d rather aim high because,hey ,if we get to the national forest and all of the spots where we intended to park are full, we may end up having to stay at a campground overnight and I’d rather have included that expense in my calculations than have it surprise me when we need it.
Alright so let me show you real quickly where to change these preferences and then we’ll come back and look at a couple of other things that I like about the RV Trip Wizard Display. So if you look up here at the top left-hand of the interface and we click on trip preferences this first step is where we can specify some of the default values that help us calculate the cost of our journey and also the distance we’re willing to travel in any given day. You can see I’ve specified my fuel economy as 6 miles per gallon. It’s not too awesome but we are driving a 34 foot motor home and pulling a Honda CR-V. We can set our average cost of fuel per gallon based on where we are or where we expect to fuel up. We can also set our RV’s height in feet and inches and in this particular case I’ve actually overestimated the height of my RV by about a foot because I’d rather know about the clearances that are going to be too close for comfort even if I might pass under them unscathed.
Below this, you can see where we set the average expenses per day. So this is a day of camping, a day of meals on the road, and here we can specify whatever we might expect on miscellaneous expenses to total. We can avoid highways or toll roads if we want. We typically don’t avoid them at least in the planning stage. We want to know the quickest way to get to where we’re going even if we don’t always choose to take major highways in getting there they’re an important part of our planning process. And then here we can also set our average driving speed and this plays into our cost per day in terms of fuel. Bear in mind that this is the average speed including fuel and rest room stops. So while we try to average 63 to 65 miles per hour on major highways realistically we’re probably going to make one to two stops for fuel and a driver restroom break while we’re cruising. Not to mention the fact that if we aren’t on major highways obviously the speed limits are likely going to be lower. So we typically leave this as 45 which I believe is the default in the RV Trip Wizard’s current version. Now below this you’ll see we’ve specified the number of miles we’re willing to travel per day. And this is what defines the bounding radius circles that you’ll see on the map when we return to the primary interface. One of the things to bear in mind is that this is as the crow flies. So these are not going to give you an accurate assessment of what driving 100 miles is going to look like. But instead where that 100 mile radius from your starting point will be. Alright from here if we save and go to step 2 you’ll see one of the other nice features of RV Trip Wizard. And that is the ability to identify and prioritize which types of campgrounds you want displayed on the map.
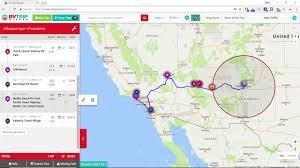
Now since we are members of a number of different campgrounds this is pretty important to us because it allows us to prioritize which are shown on the map. So for instance, we’re members of AAA as well as Good Sam, Passport America, and SKPs. However, the perks provided by each of the different camp clubs aren’t always the same. If we’re just looking for somewhere to overnight for instance, Passport America offers 50% off of the typical park prices. Whereas Good Sam and AAA normally only offer discounts up to 10% off of the nightly rate. Furthermore, if we’re staying in an area where there are BLM campgrounds or national forests available for us to camp in the beauty of these is that they’re typically either free or very low cost not to mention the fact that they’re often quite beautiful. So this allows us to prioritize which of these different types of parks we want displayed on the map. And as we’re zooming into the map based on the way we’ve numbered and prioritized these parks, if there are two parks in a given area that we are members of both the higher the higher priority park will be shown until we zoom in such that the two parks won’t overlap with one another. Alright so let’s save and go back to our trip planner. Now you can see some of this in action. So now, you see the green circle, the yellow circle, and the red circle just in the outer edges of the map. These are the bounding radiuses that we defined in that previous preferences dialogue. So if I select one of the stops on my itinerary in this particular case my starting point and I zoom out just a little bit, you’ll see that green circle, which identifies that 100 mile radius from my current location.
So that’s 100 miles as the crow flies from where I sit. Now again realistically to drive the border is probably going to be about 150 or 160 miles because I’m not driving as the crow flies. We’ve got to take major highways and we have to get to highways in the first place. The yellow line as I zoom a little bit farther out is 200 miles as the crow flies. And if I zoom even farther out you’ll see the red circle here which identifies the 300 mile radius. Which for all intents and purposes, if probably as far as I would be willing to drive in a single given travel day. And even then that’s not very likely or realistic. Now let’s zoom in and you’ll see the park icons laid on the map based on the priorities we set in that previous dialogue. You’ll also notice as we zoom in you can see some of these clearance icons here. You can see where there is a 12-13 foot bridge here. I think I saw one also down here in south Tucson. Sure enough, here’s another highway where again we’;ve got a 13 foot low clearance bridge on San Xavier Road in south Tucson. So as I zoom in you can see the icons laid on the map. Again, as we defined in the previous dialogue we see some Passport America icons. We see some Good Sam icons. The green tents just represent either privately owned campgrounds or campgrounds that I didn’t specify a priority value for in that previous dialogue. We see some national forest icons up here. I don’t see and BLM icons although I think there is some BLM land over here. It’s probably just obscured by one of our other icons at the moment. Now as I pointed out, the bounding radii that are drawn on the map are as the crow flies. And in a sense this is one of my favorite features and one of my least favorite features in RV Trip Wizard because I wish it was something more. In reality it does give me a good visual perspective on where 100 miles and 200 miles from my current location are. Unfortunately again, unless I’m driving in a straight line these aren’t very accurate estimates of what 200 miles of drive time would actually look like. Still having these radius overlaid onto the map does give me a bit better perspective than not having them and so I like to be able to get the visual indicators of where 100 miles, 200 miles and 300 miles are from where I start.
Adding stops to our current itinerary is pretty easy. We can just zoom in on a region. Let us say I want to stop off somewhere between Tucson and Phoenix. So I can zoom in on a region, identify the park where I want to stay at. In this particular case, I see Picacho Peak State Park. So let’;s say I want to add Picacho Peak State Park to my itinerary. I select the park, down below here you’ll see additional information about the park. I like the way this is displayed by RV Trip Wizard. We’ll chose the number of nights we plan to stay. In this particular case let’s just say it’s an overnight. And we’ll chose where we want to add this spot to our itinerary. We could add it to the trip end but that wouldn’t make sense since both of the next stops on our existing lists are past Picacho Peak. So instead we’ll add this after stop number one making it the first overnight stop on our journey. You will see this added a single night to our itinerary for Picacho Peak State Park. It influenced our costs but in terms of fuel, camping, food and miscellaneous expenses. Now we can see all of that reflected in the total number of nights and the total cost of our trip as well as the total miles driven down here at the bottom of our itinerary.
Overall, I think RV Trip Wizard is one of the two best trip planning tools available. And it’s one of the two tools I use pretty much every time I plan a new leg or journey. Unfortunately as I pointed out in our best RV trip planning apps blog post, none of the tools that we use are good enough on their own that I feel comfortable not using a secondary tool in order to double check and make sure that we haven’t missed anything in our planning process. Even still, if I only had to choose 2 tools RV Trip Wizard is absolutely going to remain one of those two. Thanks a lot for watching our RV Trip Wizard review.
Go to www.rvtripwizard.com to test drive the free demo. Look at a real trip built within the planner. Please note that we obtain no remuneration.
RV Trip Wizard Review – Best RV Trip Planner App

Honda Generators to Feature CO Detection

Best Generators for RVs