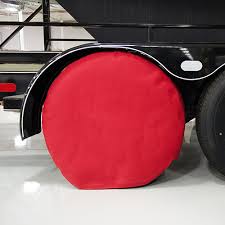
How to Make Tire Covers For Your RV
How to Make Tire Covers for a Trailer or RV
This video is brought to you by Sailrite. A tire when left exposed to the sun and weather will eventually dry rot, especially in hot tropical environments. In this video we will show you how to make your own Tire Covers out of Sunbrella Marine Grade Fabric from Sailrite. Click here
This is an easy sewing project that will prolong the life of your tires on your RV or trailer. To get started we need to take a few measurements off the tire. First get a diameter measurement then measure the center hub’s diameter. This center hub measurement will be the opening behind the wheel cover allowing the axle entrance,so be sure it is large enough to accommodate the axle. Then we need the width of the tire. Then take your tape and measure the circumference of the tire, but start where you want the fabric to start and stop a few inches above the floor. Write all those measurements down on paper. Angela has a lot of things on her paper, let’s narrow down the important details in this illustration. To each of the measurements you took add 1 inch for seam allowance and a hem for the rectangular panel.
You will be creating three panels of fabric as shown here. Sunbrella fabric is the perfect choice for trailer and RV tire covers. It is a 100% solution dyed acrylic fabric making it the most weather resistant fabric in the world. Colors are bold and stay that way even in harsh climates. Sunbrella Marine Grade fabric is water, stain,and UV resistant giving years of life even in tropical environments. Sailirite stocks hundreds of fantastic colors ready to ship for your next project. Visit us today at Sailrite. com! To make the two round wheel covers take a punch and a ruler with holes and drive it thru the fabric so you can trace the diameter dived by 2. You could also use string if you don’t have a ruler with holes. Our Diameter was 31” divided by 2 equals 15 ½”. We will use this plate for the rear of our wheel cover, so we need to cut a hole in the center for the axle. So, use the hub’s diameter measurement and divide it also by 2 and draw a circle for that. Ours was 4” divided by 2 is 2”. At the bottom of the plate we want to draw a line horizontally across the bottom of the cover that is about 1 inch up. This will help keep the cover off the ground when installed. Make two plates like this except on the second (the front plate) do not draw a circle for the hub at the center.
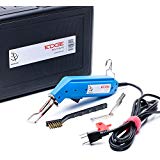 Now cut out the Sunbrella Marine Grade fabric with a hot knife to help prevent unraveling of the edge. We are using the Sailrite Edge Hot Knife. Notice to prevent damage to the table top we are cutting on top of a metal ruler. Fold the back plate (the one with the hub’s center cut out) and fold it in half keeping the horizontal cut at the bottom. Then cut along the crease you just created up to the hole in the center. Next we will cut the rectangular panel out. Measure it to the size required for your tire then use the hot knife to seal the edge of the fabric. If you don’t have a professional hot knife like this you could use a soldering iron or a wood burning tool. We will not start to sew our plates. First we want to fold the horizontal edge at the bottom of the two circular plates up to create about a ½ inch hem. We are sewing with V-92Polyester thread and a size #20 needle. We set the stitch length to 6 to 7 mm in length and we are sewing a straight stitch. Take the rectangular boxing strip and sew a ½ inch hem on the two short ends. Notice that when Angela starts and ends her sewing she does some reversing to lock the stitch in place. Measure the length of the slit on the rear plate, ours is about 12 inches.
We will now cut a rectangular panel that will be used to make a Velcro closure for the slit. It should be about the length of the slit and 3 inches wide. Cut it out with the hot knife. Sew a ½ inch hem on the two short ends. Cut a 2 inch Velcro to the same length as the flap. Then sew the edge of the Velcro to the edge of the flap overlaying the edges about a 1/2 to 1/4 inch. We are sewing the hooked sided Velcro to this panel, but it does not matter if it is hook or loop. After this is sewn down we will fold it back onto the other side. Thus creating a nice single hem. Angela folds the Sunbrella back so the fold is even with the edge of the Velcro and creases it well. Then sew the opposite long side. Then she will sew the opposite long side of the Velcro. To keep the Velcro down along the hemmed side sew another stitch down the first stitch line. Cut the opposite side of the Velcro, for us it is the loop side, the same length as the first. We will sew this Velcro on the opposite side of the hem (outside surface). Lining it up along the slit, as shown in the video. Here we will sew it down while installing a binding along the edge. We are using the 1 inch swing away straight angle binder to automatically fold and sew the binding while feeding the Velcro and slit edge into the opening of the binder.
If you do not have a binder like this you can simply fold the binding by hand and feed it by hand into the sewing machine while keeping the assembly together. The straight angle binder does not sew inside edges well, so here Angela pulls some extra binding away from the binder and she will now sew the binding on by hand here around the inside of the circle. Sewing binding on without using a binder is more time consuming but it does work. Notice that she carefully folds the binding on the edge and then sews a few inches and stops and then repeats the process. Also take note that when she stops she will bury the needle by rotating the balance wheel by hand. This keeps the last stitch position so she can easily make modifications and folds to the binding before having to sew the next few inches. When we get to the next turn, going down the slit, watch how she does it. She will bury the needle to the thickest part of the shaft, keeping her position, lift the presser foot,roll or turn the fabric around, lower the presser foot and then sews. Once she reaches the straight away she will then pull the binding back thru the binder and then swing it into position and use it for the rest of the slit opening. Before proceeding down the length of that leg place the flap with Velcro that we made earlier into the binder and sew it on while sewing the binding in place. Just be sure to keep the two edges of the fabric inside the opening of the binder attachment and it will come out perfect. One of the nice things about Sailrite’s Swing Away Binder is the fact that it can swing away not only to sew binding on by hand, but also when a reverse stitch needs to be made. Now simply sew on the opposite side of the Velcro. To keep the flap flat, sew a top stitch along the primary stitch. The flap is done and we are ready to sew the panels all together now. That’s coming up next!
We’re going to sew the boxing strip to the front plate. To do this find and mark the center of each by folding the assembly in half. We will start sewing at that center mark, this will keep the boxing centered. We will sew around the one half keeping the stitch about a ½ inch away from the raw edges of the fabric. Also keep the edges lined up as you sew. When we get to the end do some reversing and now we will turn the assembly over and start sewing again from the center mark and complete the other side. When we reach the end of the boxing fold the raw edge over towards the wrong side of the cover and sew this approximate ½ inch hem down to the horizontal hem. We need to repeat this ½ inch hem on the other side as well, we will not show that. Next we are going to create a top stitch on the area that secures the boxing to the plate. This is called a semi-flat felled seam. As Angela sews this top stitch in place notice that she is pulling on the sides of the fabric to splay the fabric out flat. This top stitch should be sewn about an 1/8 inch from the seam or fold. Then when she gets the other side she will create a half inch fold, folding it under, and continue the top stitch to the end. This creates a ½ hem here. Next take the back panel with the slit, to accommodate the axle, and position it so that bottom edge is lined up correctly with the opposite side assembly. Then begin sewing it in place to the boxing keeping the stitch about a half inch away from the fabric’s edge. As it is being sewn down she is being careful to line up the raw edges of the fabric as she sews. We have skipped ahead here and are showing the end of our stitch. Always do some reversing to lock the stitch in place. Turn the assembly right side out. The bottom has some raw edges at those locations we will hem the fabric to a half inch, folding it under, and sew it. Our tire cover is now complete. Coming up next is the materials list and tools that were used to make this cover.
Materials:
Sunbrella Marine Grade Fabric from Sailrite
V-92 PolyesterThread from Sailrite
Vecro Back 2″ – Item 10026 loop & 10055 hook
Sunbrella Acrylic Binding Bias from Sailtite
Tools
Sewing Machine, yardstick, pencil, scissors
Tape measure – 120 inch – Item 10296
Scratch Awl Yellow – Item 2354
Sailrite Edge Hotknife Package – Item 103800
1″ing-away straight binder – item 100103
You will find a complete line of Sunbrella Marine Grade fabrics at discounted prices in the shopping cart at Sailrite. com.or from this link to Amazon. Click here
For Sailrite items. Click here
Camco RhinoFLEX 20-Ft Camper/RV Sewer Hose Kit Review

The Cassette Toilet